How-To: Throttle Cable Adjustments
The throttle cable may seem like a simple part of your bike, but it can keep you from riding if not properly maintained or replaced. Read as we take you through cable maintenance and install tips for a new ProX throttle cable.
With the riding season upon us, it’s not a bad time to cover an important, but often neglected, maintenance task: throttle cable inspection and replacement. The throttle cable connects your mind and body to the heart of your machine, which makes it an incredibly important link. Worn, damaged, misadjusted, or corroded throttle cables can lead to dangerous riding conditions and poor engine performance. Let’s dive into tackling this common maintenance task.
![]()
The throttle cable is a critical component to your bike’s function, but it’s often overlooked. Follow the guidelines below to make sure you’re not stuck with a malfunctioning throttle.
![]()
Most service manuals suggest checking throttle operation after each race or every 2.5 hours of operation. Along with this generic recommendation, engine performance can also be an indicator of cable issues. Poor full throttle operation may be a sign that the throttle cable has too much slack. An engine that is difficult to control or has an erratic idle may indicate that there is not enough throttle cable slack.
Your service or owner’s manual should provide all the pertinent cable adjustment information you need for your specific make/model of machine, and should be used to complement the advice and recommendations provided in this write-up. Within the service manual, you should find free play specifications, throttle cable routing information, lubrication info, and the prescribed tensioning procedure.
We’ll start by outlining the basic checks and adjustments that should be performed to ensure correct throttle cable operation. Once these are concluded, we’ll discuss complete cable replacement.
Cable Condition
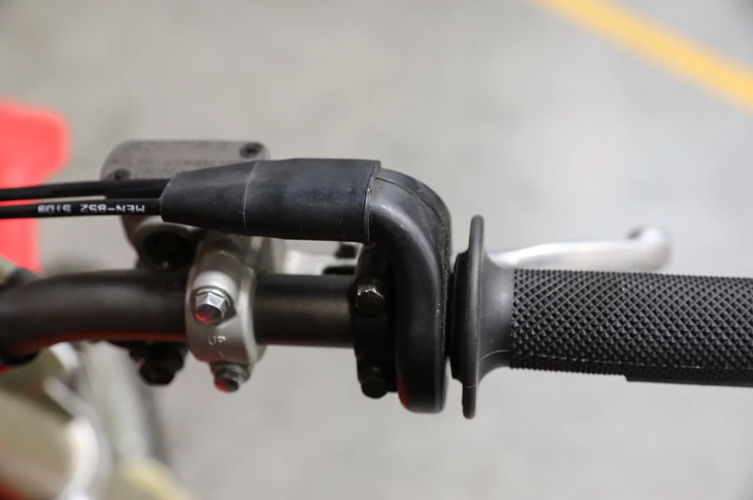
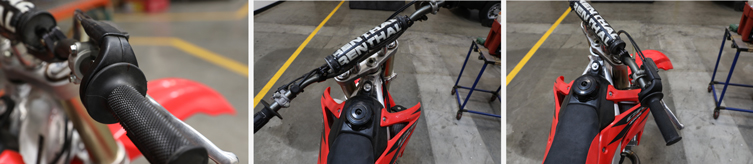
The throttle cable should be visually inspected for damage. Cracks, kinks, corrosion, and severely worn areas due to rubbing should all be cause for concern. Systematically inspect the cable from the throttle grip to the throttle body/carburettor as best as visually possible.
![]()
Do your best to visually follow the routing of the throttle cable to inspect for damage and wear regularly.
![]()
Checking Cable Free Play
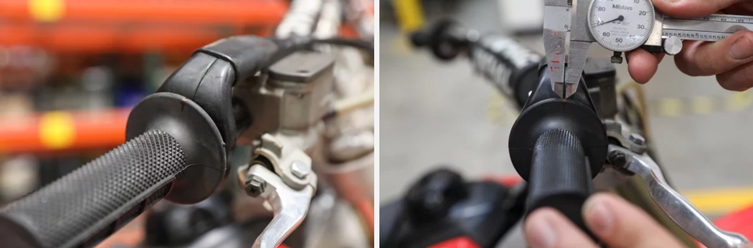
Throttle cable free play is typically checked by measuring the amount of throttle grip movement relative to a fixed point on the throttle cable housing. Most makes/models specify 2-3mm of throttle grip free play. This can easily be checked by referencing a predominant feature on the throttle grip, or marking it with a marker and measuring the amount of motion relative to the housing with a ruler, scale, or caliper.
![]()
You can measure throttle cable free play by marking the grip in accordance with a reference point, such as the split in the throttle cable housing. Twist the throttle until you feel resistance, and measure the amount of movement.
![]()
Checking Throttle Return
All throttle systems designed for powersports applications are designed to fail closed in the event the throttle cables break or the rider loses control of the machine. Return spring pressure can be inadequate if the throttle cables are sticky, binding, or if the throttle grip is binding on accessories such as handguard mounts.
Check throttle operation by fully opening the throttle and letting go. Confirm that the throttle quickly and easily returns completely to the closed position. Check throttle return with the handlebars all the way to the left, centred, to the right, and halfway between centre and full stop on each side. If the throttle does not completely return the cable may be binding, incorrectly routed, frayed, or corroded, which warrants further investigation.
![]()
With the bike OFF, twist the throttle open to the stop and let go. Make sure the throttle returns to the closed position quickly and easily. Perform this test with the handlebars turned to both extremes, as well as at multiple positions in between.
![]()
Throttle Cable Adjustment
Most modern machines utilizing throttle bodies and carburettors utilize two throttle cables, aptly identified as accelerator and decelerator cables. Older carbureted machines often only feature one throttle cable. Depending on the type of machine you own, the adjustment process may differ slightly from the outline I’m going to provide.
The number of adjustment locations will also differ depending on the machine in question. Some applications have adjustment points at the throttle body or carburettor and at the throttle cable housing, while others have a single adjustment point on the throttle cable housing. On machines with multiple adjustment points, minor adjustments are made at the throttle cable housing and major adjustments are taken care of on the throttle body/carburettor.
Dual Cable Adjustment
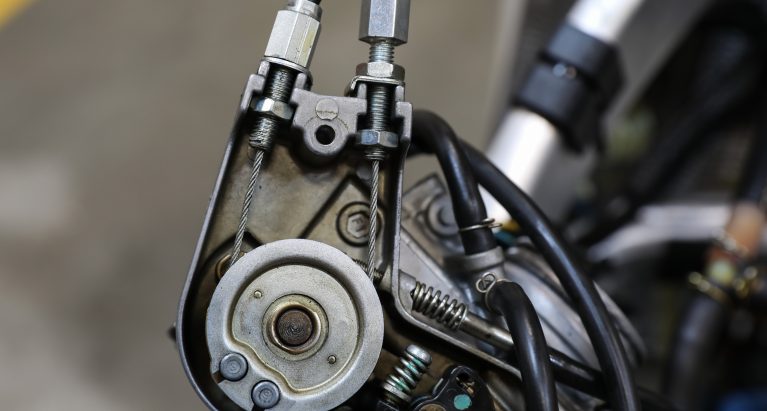
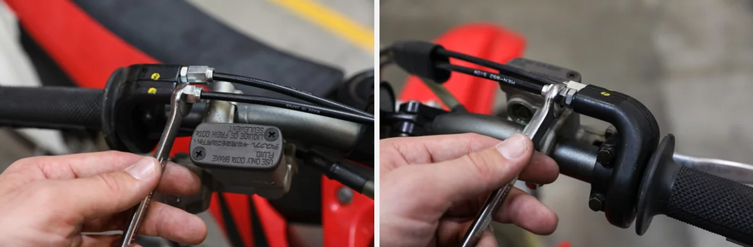
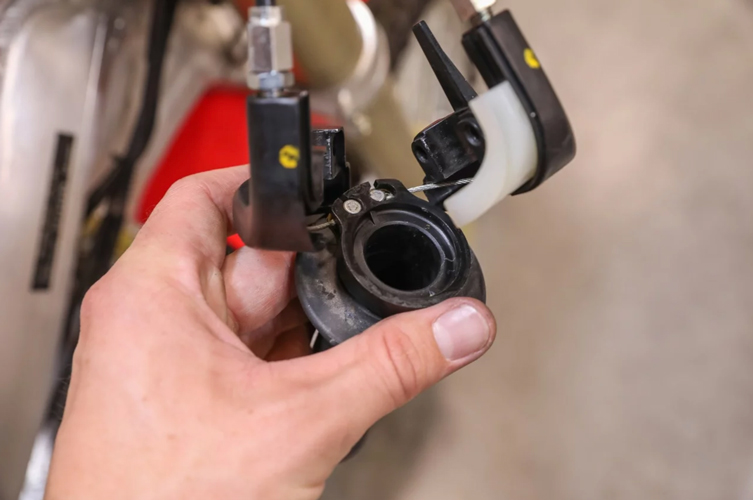
The first step to adjusting dual throttle cable machines is to remove any necessary dust covers and identify the accelerator and decelerator cables. The accelerator cable goes into tension when the throttle is twisted open and the decelerator cable is put in tension when the throttle is closed. Each cable is often easily identified visually by looking at the housing design or by making minor adjustments and determining what is affected.

![]()
Remove any dust covers from your throttle cable housing and determine which cable is the accelerator and which one is the decelerator.
![]()
To adjust the cables, the locknuts are loosened and the cable adjusters are turned in to slacken or out to tension them. This can be accomplished by hand or with an appropriately sized wrench. Commonly, the decelerator cable is adjusted first. Decelerator cable tension is usually set so that there is no play when the throttle grip is completely closed. Once the decelerator cable has been set, the accelerator cable is adjusted. The accelerator cable tension is usually set so that 2-3mm of free play is present in the throttle grip. Once the correct tension has been applied, the lock nuts should be snugged and any dust covers should be slid back over the adjusters.
![]()
Cables can be adjusted using the appropriate size wrench. Turn in to slacken, and out to tension. Feel the throttle as you adjust to know how close you are. Typically, the decelerator is adjusted first.
![]()
Single Cable Adjustment
Single throttle cable adjustment is straightforward. Any dust covers protecting the cable adjuster should be removed first. Next, the locknut should be loosened. The cable adjuster can then be adjusted in or out so that the throttle grip has the correct amount of free play, which is usually 2-3mm. Once complete, the locknut can be snugged and dust cover reinstalled.
Checks After Adjustment
Upon completion of any cable adjustments, the system should be checked as outlined in the throttle return section of this article. Once you have confirmed that the throttle return functions properly in all handlebar positions, the engine should be started. With the engine idling and in neutral, rotate the handlebars from stop to stop and listen for any changes in idle behaviour. Increases or decreases in idle speed may suggest that the throttle cable is binding either due to tight spots or cable routing.
Throttle Cable Replacement
In the event that the throttle cable warrants replacement, cable replacement can be accomplished fairly easily. Selecting and sourcing a new throttle cable is equally important as carrying out the work. Sourcing OEM parts from a dealer can lead to overpaying, so it’s common for people to turn to the aftermarket. However, it’s important to be careful not to sacrifice quality for cost.
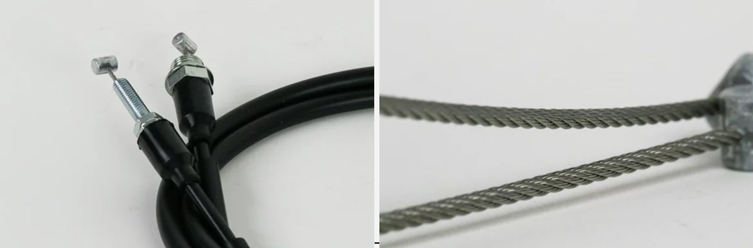
ProX offers throttle cables made by OE manufacturers at affordable prices. Because they’re made by OEM suppliers, OE quality and specifications are met. ProX throttle cables are made with pre-lubricated nylon inner sleeves, tightly-wound steel inner cables, and a flexible PVC outer jacket, which, combined, ensure smooth cable operation and long life.
![]()
ProX throttle cables are made by OE suppliers to OEM specifications, and they offer more affordability.
![]()
Head over to the Bikes and Bits Dealer Locator to find your nearest ProX parts dealer.
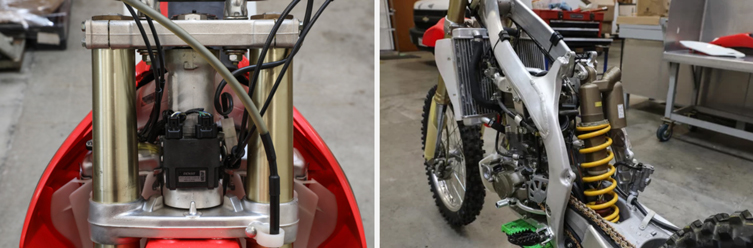
The architecture of your specific machine will largely dictate what must be removed in order to successfully replace your throttle cable. Typically, the following components will need to be removed:
- Front brake master cylinder (sometimes)
- Front number plate
- Seat
- Fuel tank
- Rear subframe and airbox
- Throttle body/carburettor
![]()
Be sure to remove the necessary components to easily access the throttle cable and throttle body or carburettor.
![]()
Once the necessary components have been removed, replacing the throttle cable is straightforward. We’ll walk through the necessary steps with the assumption that we’re working on a dual cable machine. The steps for a single cable application are nearly identical.
Start by loosening the throttle cable adjusters on the throttle housing and slackening the cables. Next, remove the fasteners holding the throttle cable housing together. Once removed from the handlebar remove the throttle cable ends from the throttle cable housing pulley. Note the accelerator and decelerator cable positions.
Note the accelerator and decelerator throttle cable positions before removing them from the throttle housing pulley.
![]()
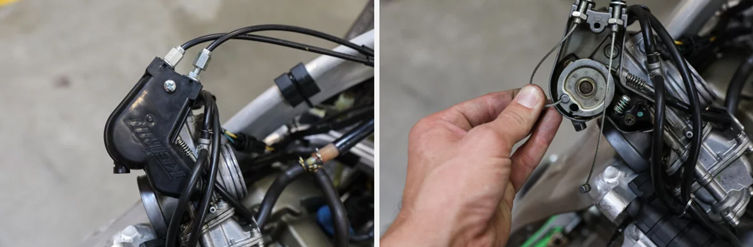
Remove any necessary covers from the throttle body or carburettor to gain access to the throttle cable ends. Note the locations of the accelerator and decelerator cables prior to removing them. Loosen the necessary lock nuts and adjusters then remove the cable ends from the pulley.
![]()
Remove the protective cover from the throttle body or carburettor, note which cable is which, and carefully remove the cable ends from the pulley.
![]()
On single cable carbureted applications featuring round or oval slide carburettors, unscrew the top cap of the carburettor where the throttle cable enters the slide. Compress the return spring and carefully remove any necessary hardware securing the cable end to the slide. Once removed, the cable can be loosened and removed from the carburettor cap.
Prepare the new throttle cables by applying cable lube to both ends of the cables. Check the smoothness of the cables by moving them back and forth prior to installation.

![]()
A cable luber is a great tool to have. It simply fixes to the end of the cable, and allows the lube to flow through the inside of the cable.
![]()
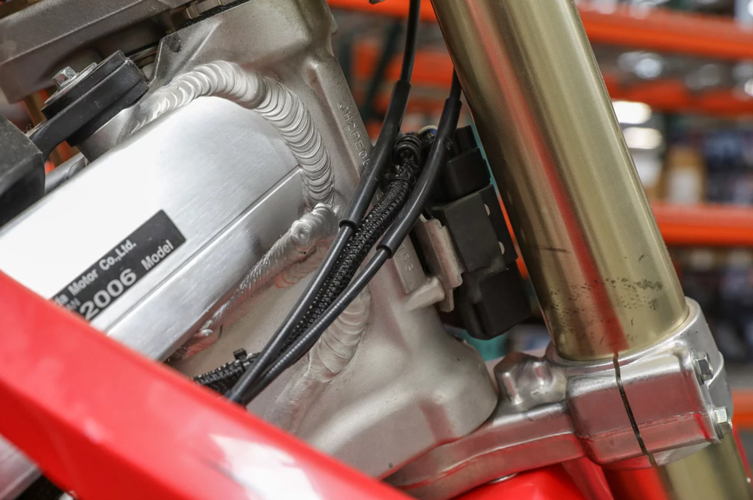
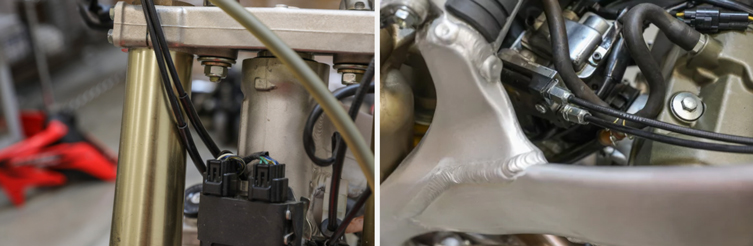
Once the old throttle cables are free on both ends, note how they have been routed. Then, remove the cables and route the new cables in a similar fashion. If the old cable routing is suspect, confirm with your service manual the factory prescribed cable routings.
![]()
Be sure to follow the OEM routing when installing your new cables.
![]()
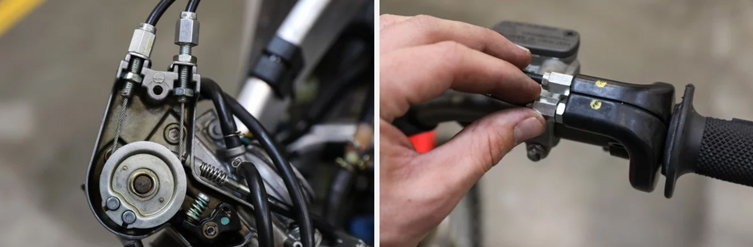
Upon successful cable routing, begin the reassembly process. Start by installing the cable ends into the throttle body/carburetor and throttle cable housing. Turn the cable adjusters on the throttle grip housing all the way in, then turn each of them one turn out. Once this is done, unless otherwise specified, use the throttle body or carburetor adjustment features to take the majority of the slack out of the cables. Refer to the tips outlined in the cable tension adjustment section to correctly tension the throttle cables. After the cable tensions have been set, be sure to check the functionality of the throttle return as prescribed previously.
![]()
Take the majority of the slack out of the cables at the throttle body/carburettor adjustments first, then fine-tune your adjustments at the throttle housing.
![]()
Once the new throttle cables have been installed and the return checks are complete, finish the job by reinstalling any items that required removal to gain access to the cable system. With everything reinstalled, test the functionality of the system first with the engine off, then with the engine idling to ensure there are no abnormalities.
Related Content

HOW-TO: CLUTCH CABLE CARE

HOW-TO: REPLACE A 4-STROKE PISTON
You might also like...

HIGHLIGHTS: 2026 TRANSMOTO 8-HOUR AT NARRABRI, POWERED BY KTM
Check out the highlights video from the 2026 Transmoto 8-Hour at Narrabri, NSW, powered by KTM.

2026 SMX WORLD CHAMPIONSHIP VIDEO PASS
The SMX Video Pass is back, and again providing live and on-demand access to all 31 rounds.

2026 ENDURO & CC MODELS: 7-BRAND PRICE COMPARO
A handy table of easy-to-compare prices for seven brands’ 2026 enduro and cross-country models.

HONDA CLAIMS EIGHTH AUSX TITLE
Dean Wilson sealed the deal for Honda with a dominant 2025 Australian Supercross season.
National Motorcycle Insurance
8 months ago
Ride Smart | Presented by National Motorcycle Insurance
Transmoto’s Simon Barratt covers some handy tips on how to protect your dirt bike, presented by National Motorcycle Insurance.
KTM
9 months ago
KTM DOMINATES 2025 AUSTRALIAN ENDURO CHAMPIONSHIP
The KTM DM31 Racing Team wrapped up four titles at the weekend’s AusEnduro season finale.

Boost Secures 2025 AUSX Naming Rights
The Australian Supercross Championship is set to launch into its biggest season yet.

TT Circuit Assen To Host 2027 MXoN
The 80th edition of the MXoN will see the legendary event return to Dutch soil in 2027.
Be the first to comment...