Friday Fix No.5 – Chain Adjustment
Chain tension is very important, and is something that should be checked for adjustment every time you ride your bike. A loose chain can contribute to decreasing both the chain and sprocket life. In some extreme cases, the chain can even derail and cause considerable damage to the engine/transmission. With these key factors in mind, it’s best that you start the habit — if you haven’t already — of checking your chain each time you throw your leg over your bike. Here’s how the job’s done.
STEP 1: Visually check the chain

Firstly, you can get a fair idea of your chain’s adjustment by looking at it. There should be a slight amount of slack in the chain — it shouldn’t be tight, but it also shouldn’t be too loose. A feel for this will come with time.
STEP 2: Manually check the chain

With the bike on a stand and the rear wheel in the air, push the underneath-side of the chain up with one finger till it touches the swingarm, with the rest of the chain taut. You’re usually aiming to have your finger pointing to the chain-slider bolt — if it’s forward of that the chain’s too tight, and if its further back the chain’s too loose.
STEP 3: Loosen the axle nut

Loosen the rear axle nut to allow you to move the wheel assembly back and forward. There’s no need to take it all the way off, though.
STEP 4: Release the adjusting bolts

Undo the locking nuts that hold the adjuster bolts tight on both sides to allow you to turn the bolts. A hit of WD40 could help if there’s corrosion.
STEP 5: Measure adjustment blocks

Push the wheel assembly fully forward so the adjustment blocks are touching the adjusting bolts, then jot down the position of the assembly using the indent markings on the swingarm. Some mechanics prefer to measure the distance between the back of the swingarm and the rear of the adjustment blocks, as they don’t trust the factory indents, but ensure the swingarm is an even length on both sides if you use this method. This will give you a benchmark for your adjustment.
STEP 6: Adjust chain tension through adjusters

If the chain is loose, move the axle back by unscrewing the adjuster bolts on both sides. Conversely, screw in the adjuster bolts if the chain is too tight. What you do to the adjuster bolts on one side, you must do to the other.
STEP 7: Re-check chain tension

Again, push the wheel assembly fully forward, then give the axle bolt a quick nip to hold the assembly in place. Then re-check the chain tension as in step 2.
STEP 8: Re-check measurement

Once you’ve got the adjustment correct, ensure the axle is straight by ensuring the adjustment is exactly the same on both sides.
STEP 9: Tighten adjuster bolts

Once you’re happy with the adjustment, stop the adjuster bolts moving by holding it with a spanner, then tighten the locking nuts.
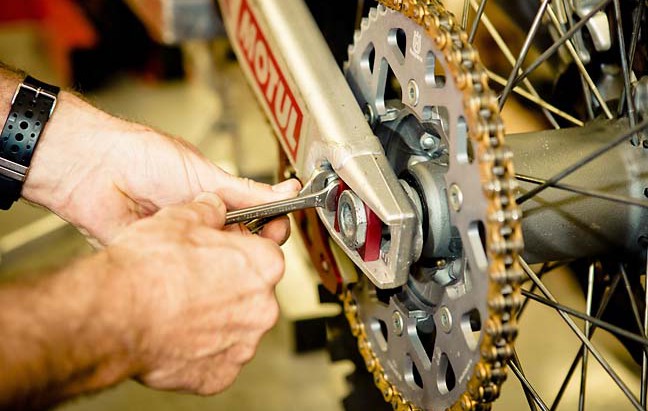
STEP 10: Tighten chain for axle nut tension

To ensure the wheel assembly is fully forward, ‘throw a spanner in the works’ as in the picture and spin the wheel backwards. This will ensure the adjuster blocks are tight up against the adjuster bolts.
STEP 11: Tighten axle nut

With the spanner still jammed between the sprocket and chain, and while keeping backwards pressure on the wheel with one hand, nip up the axle nut, then do it up to the correct tension. Check the chain tension one final time, as per step two, then take the bike off the stand. Finally, bounce up and down on the rear suspension, ensuring that the chain doesn’t go fully taut at any point in the stroke. If it does, the chain is too tight, so you’ll need to back it off.
You might also like...

2026 SMX WORLD CHAMPIONSHIP VIDEO PASS
The SMX Video Pass is back, and again providing live and on-demand access to all 31 rounds.

2026 ENDURO & CC MODELS: 7-BRAND PRICE COMPARO
A handy table of easy-to-compare prices for seven brands’ 2026 enduro and cross-country models.

HONDA CLAIMS EIGHTH AUSX TITLE
Dean Wilson sealed the deal for Honda with a dominant 2025 Australian Supercross season.
National Motorcycle Insurance
5 months ago
Ride Smart | Presented by National Motorcycle Insurance
Transmoto’s Simon Barratt covers some handy tips on how to protect your dirt bike, presented by National Motorcycle Insurance.
KTM
6 months ago
KTM DOMINATES 2025 AUSTRALIAN ENDURO CHAMPIONSHIP
The KTM DM31 Racing Team wrapped up four titles at the weekend’s AusEnduro season finale.

Boost Secures 2025 AUSX Naming Rights
The Australian Supercross Championship is set to launch into its biggest season yet.

TT Circuit Assen To Host 2027 MXoN
The 80th edition of the MXoN will see the legendary event return to Dutch soil in 2027.

First Look: Aus MXGP Battleground
The 2025 MXGP of Australia track design has been revealed.
Be the first to comment...